This tutorial will give you an introduction to the view and scene setup in Away3D 4, the basic requirements for creating your 3D environment.
Contents
Introduction
Working in Flash and Actionscript, you will be familiar with the concepts of using the standard display list for drawing and animating content. Away3D versions earlier than 4.0 all relied on this standard display list to render objects to your scene, however since Flash Player 11.0 and Away3D 4.x you can now take advantage of GPU hardware accelerated graphics for rendering performance as commonly seen in games, allowing you to create complex and immersive experiences for the web and using Adobe AIR, on mobile devices as well.
The Flash Players GPU implementation is called Stage3D and works quite differently from conventional display list objects. There are numerous introductions and examples on the internet about Stage3D so this bit will be brief (Check out How Stage3D works.). The main things to remember are that the Stage3D instances (as there can be up to 4) will always appear behind the standard stage objects. The Stage3D instances are layered on top of each other and are not transparent. This means that you cannot put a standard display object Bitmap in the background, for example. Away3D 4.0 uses Stage3D and automatically manages many other aspects of it’s usage, leaving you to focus on the 3D content and interaction.
Listing 1. Basic View example.
Source code.
Create and setup the 3D scene.
To create your 3D experience, you need to have a 3D world to contain your objects and a mechanism to view those objects. Away3D has a View3D class which gives you the ability to do exactly this. Here is an example of how you use it. (Note: these code snippets are taken directly from the full source of the example).
//setup the view
_view = new View3D();
addChild(_view);
Once you have created a new instance of the View3D class you need to add it to the stage as you do with any other display object, however as described above, because this is Away3D 4.x and uses Stage3D, it will always appear behind any conventional display object. Technically, the View3D does not have any visible properties, but creates the Stage3D instance as required and being a displaylist object, allows events, such as Event.ENTER_FRAME to be used.
The View3D has a number of important properties that are needed for you to continue creating your world. Firstly, the _view.scene property is a container for your 3D objects, which will be discuss later when we add objects to the scene. Secondly, the way your 3D world is to be seen by the user is through the _view.camera property. Fortunately, both of these properties are created with default values when the View3D is constructed.
The following lines alter some of the camera default values to reposition it in your 3D world and change the direction in which it points. The camera.lookAt() orients the camera to look directly at the specified 3D coordinates. In this case, new Vector3D(); is the XYZ location (0, 0, 0).
//setup the camera
_view.camera.z = -600;
_view.camera.y = 500;
_view.camera.lookAt(new Vector3D());
Add a textured object to the scene
At the moment, your 3D world isn’t particularly exciting as there is nothing in it, so lets change that. To make the floor object in the example you need to add a Plane which, by default, made from two triangles arranged in a square.
//setup the scene
_plane = new Mesh(new PlaneGeometry(700, 700));
_view.scene.addChild(_plane);
One thing you may notice is that the mechanism to create a new plane is a little different to Away3D V3.6. In Away3D 4, the primitives are geometry creation tools rather than complete meshes as they were in V3.6. One of the main reasons for this is to take advantage being able to re-use the geometry data for multiple objects, avoiding the overhead of having to re-upload the same data repeatedly.
The Mesh constructor looks like this:
var mesh:Mesh = new Mesh(geometry : Geometry, material : MaterialBase = null);
As you can see, the Mesh takes a geometry parameter which in your case is a new PlaneGeometry with dimensions of 700 x 700. The second parameter is the texture to be used on the Mesh. The texture supplied needs to be of a type extended from MaterialBase which can be either a ColorMaterial, TextureMaterial, SegmentMaterial or SkyboxMaterial.
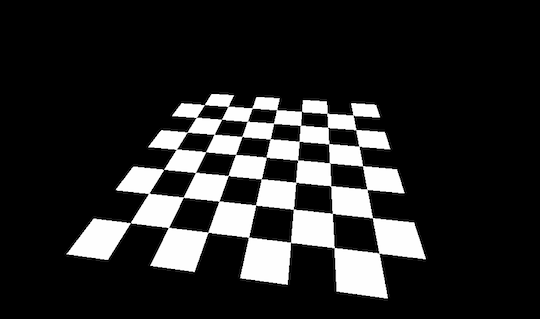
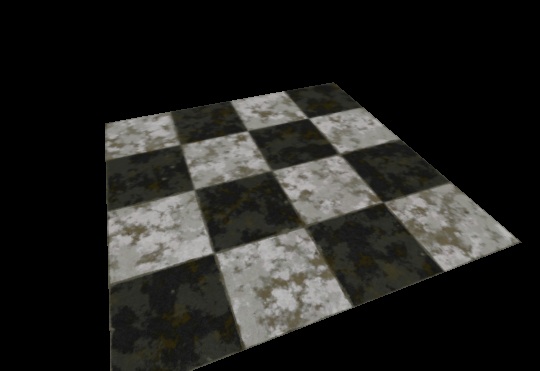
The plane you have just created looks fine except that it doesn’t look quite like the floor in the example above. The reason for this is that you haven’t specified a texture material for the plane and a default, black & white checkerboard has been used instead. To add a texture, you need to modify the Mesh parameters to include a reference to your chosen texture, as follows. Using the Cast.bitmapTexture() you can easily create the required texture material from a BitmapData.
_plane = new Mesh(new PlaneGeometry(700, 700), new TextureMaterial(Cast.bitmapTexture(FloorDiffuse)));
There are a number of primitives available to you in the away3d.primitives package, including SphereGeometry, CubeGeometry, ConeGeometry, CylinderGeometry, etc.
Rotate the object
Now you have your checkered floor in front of you, it’s now time to give it something a little more interesting to rather than just sit there. How about a simple rotation? You can listen for the stage ENTER_FRAME event which fires before rendering every frame so can update the rotation of your floor plane and re-render the scene.
To add the event listener, use the following.
//setup the render loop
addEventListener(Event.ENTER_FRAME, _onEnterFrame);
The _onEnterFrame method will add 1 to the Y (vertical) rotation of the plane and the you call _view.render() which is required to draw your 3D world.
/**
* render loop
*/
private function _onEnterFrame(e:Event):void
{
_plane.rotationY += 1;
_view.render();
}
The full example also has an event listener method that is executed when the stage is resized. This allows the dimensions of the View3D to be adjusted to fit the new size of the flash player window.
Conclusion
In this tutorial you have managed to construct a very basic scene to display a rotating texture floor using Away3D 4 and taking advantage of GPU hardware accelerated graphics.