This tutorial presents a detailed look at mouse interactivity in Away3D 4.x.
Contents:
Introduction
Every 3D engine needs to solve a very basic problem: what’s under the mouse? In 3D graphics, this is commonly referred to as picking. Although it may sound as a simple and straight forward problem, it actually involves non-trivial mathematics, very efficient algorithms, and is definitely much more complex than its 2D counterpart. Detecting what object is beneath the cursor in a 3D scene can be in fact a programatically expensive task. But don’t panic! Away3D offers a series of carefully crafted features in order to deal with such a problem, taking into account the Flash Player’s capabilities and limitations, and giving the user plenty of flexibility to find the best balance between precision and performance for each particular implementation.
In this article, we will explore the engine’s picking feature set, get to know how easy it is to use them, and understand how to master the subtleties in order to achieve an efficient implementation in advanced and demanding projects.
Hello Picking
So lets get right down to business. Have a look at the following example, and it’s code, below:

Listing 1 ( click image to launch ). Basic mouse interactivity on a 3D scene. Hover over the objects to change their material from gray to red. Full source code.
The key parts of the code are:
anObject.mouseEnabled = true;
anObject.addEventListener( MouseEvent3D.MOUSE_OVER, onObjectMouseOver );
private function onObjectMouseOver( event:MouseEvent3D ):void {
 // do stuff…
}
And its as simple as that.
Of course, you can use all the other mouse event types, just like in 2D. The idea is that the interface is what you know and are already familiar with. Nothing new here. But it is 3D picking though, and things can get more complicated, as stated before, so lets have a look under the hood and see what’s going on in the 3D engine.
Entity Properties
Picking in Away3D can be managed by a set of properties within 3D entities. Lets have a look at them.
MouseEnabled
So, how is the engine doing the picking? Basically, the engine is casting a ray from the camera, through the mouse position on the screen, and straight into the scene. This ray could potentially hit several objects within the scene. One way to determine which objects are hit is using raw ray collision mathematics. This involves calculating ray-sphere collisions, ray-aabb collisions, ray-triangle collisions, etc. The most expensive part of this process is finding out if the ray hits the inside of a triangle in a mesh, which could potentially contain a very high poly count. Now, ray tracing is not the only method used for picking. Away3D in fact has 2 different methods and uses this one by default for reasons we will discuss further along in this tutorial. Figure 1 below shows the basics of the ray tracing approach.
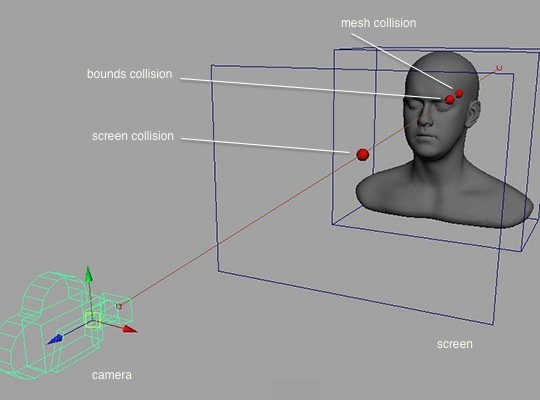
Figure 1. Tracing collisions from a ray cast from the camera, through the screen, into a mesh’s bounding volume and into the mesh’s triangles.
When you set mouseEnabled to true on any object, you make it eligible for these collision evaluations. This property is set to false by default on all objects in order to avoid potentially complex calculations.
Now, you can have an object mouse enabled but with no listeners attached to it. The result of this is simply occlusion. The object collides with the ray, but triggers no mouse events. You can see an example of this on listing 2, which is just the same as listing 1, but simply comments out the attachment of listeners to one of the objects.

Listing 2. MouseEnabled and listeners. Both objects are mouse enabled, but only one listens for mouse events. The object with no listeners, simply occludes interaction
on the other. Full source code.
If the occluding object was not mouse enabled, the picking ray would just pass through it, ignoring it completely. Again, this is the default behaviour for all scene objects unless you specifically set the mouseEnabled property to true. This is pretty much the way it works on the regular Flash 2D display API, but in that case objects are mouse enabled by default because picking is so much cheaper in two dimensions.
Picking Colliders
You may have noticed on the previous listings that ( after rotating the camera to very specific angles ) picking around the sphere is not very accurate. In listing 1 or 2, if you hover the mouse close enough to the sphere, it will trigger a mouse over, even though the mouse is not actually over the object. Hmmm… not good.

Figure 2. 3D object’s mouse interactivity is set to BOUNDS_ONLY by default.
The engine set’s the picking precision for all objects to BOUNDS_ONLY by default. If you have a look at figure 1 again, what’s happening is that the ray is being “stopped” at the mesh’s bounding volume surface and collision calculations with its potentially hundreds or thousands or millions of triangles is avoided by default. If you do need more precision, you just need to tell the ray to keep going. You change this using the following property:
anObject.pickingCollider = PickingColliderType.BOUNDS_ONLY; // default
//anObject.pickingCollider = PickingColliderType.AS3_FIRST_ENCOUNTERED;
//anObject.pickingCollider = PickingColliderType.AS3_BEST_HIT;
// etc…
BOUNDS_ONLY is the cheapest picking collider that the engine offers and is accurate enough for more cases. If you want more precision, you just chose a different one:
-
PickingColliderType.BOUNDS_ONLY ( default value )
Calculates ray vs bounding volume collisions. -
PickingColliderType.AS3_FIRST_ENCOUNTERED
Calculates ray vs all mesh triangles collision. This costs considerably more than BOUNDS_ONLY (1) and is heavier as the number of triangles in the mesh increases. The collider stops all tests as soon as a collision with a triangle is found, despite the fact that the hit surface may not be the mesh’s closest surface along the ray to the camera. -
PickingColliderType.AS3_BEST_HIT
As the previous collider, but more detailed, evaluating which of the triangles that collide with the ray is closest to the ray’s origin. This is necessary if you want to accurately know the collision point on a mesh that may have more than one possible collision surface with the ray, such as a mesh representing a coffee cup, for example. AS3_FIRST_ENCOUNTERED (2) could incorrectly resolve a collision with the inner walls of the cup whereas this collider will not stop tests on the first hit, but will instead find all collisions and evaluate the best one overall. -
PickingColliderType.PB_FIRST_ENCOUNTERED
This is the same as AS3_FIRST_ENCOUNTERED (2) but uses pixel bender instead of pure Actionscript for ray collision calculations. This method proves to be faster for higher-poly meshes and slower for lower-poly meshes. Pixel bender takes advantage of multi-threading if it can, meaning that such a collider will tend to be faster on desktops, but may not be on simpler CPU’s like those found on mobile devices. Furthermore, AIR for iOS simply does not support pixel bender at this time, which causes this collider to fail silently. -
PickingColliderType.PB_BEST_HIT
Pixel bender equivalent to AS3_BEST_HIT (3). -
PickingColliderType.AUTO_FIRST_ENCOUNTERED
As AS3_FIRST_ENCOUNTERED (2), but automatically decides wether to use the actionscript or pixel bender version of the collider depending on the poly count of the mesh. -
PickingColliderType.AUTO_BEST_HIT
Same as AUTO_FIRST_ENCOUNTERED (6) but with the behaviour of AS3_BEST_HIT (3).
As you can see, there’s a lot of choices! Deciding which picking collider to use is a delicate topic, and it is important to understand what each available type does in order to choose the best balance between performance and precision. For instance, you would choose PB_BEST_HIT (5) on an application that paints on a high poly mesh where you want very accurate picking precision, but would definitely not choose such a collider for a game where you need to be able to click on a low poly mesh that occupies a small portion of the screen. Such a poor choice would be a waste of resources, specially if you enable such type of mouse interactivity on many of such low poly objects! Deciding which collider type to use is very important, but an easy task once you understand the basics of each collider type. Hence, to solve our problem on figure 2, we could just set a different collider type on the object:
sphere.pickingCollider = PickingColliderType.AS3_FIRST_ENCOUNTERED;
Or, we could simply change the sphere’s bounding volume to a BoundingSphere instead of an AxisAlignedBoundingBox (Away3D sets all bounding volumes to AxisAlignedBoundingBox by default). This would allow us to get the precision we want without the need to enter the volume and perform costly ray triangle collision calculations. Of course, this is a very specific, almost theoretical case, but its important to keep in mind that the core of this picking technique is bounding volumes, and different bounding volume shapes can be very helpful. In code, this is how you change a bounding volume:
sphere.bounds = new BoundingSphere();
Either way we choose to resolve our precision problem, the result can be appreciated in listing 3:

Listing 3. More accurate picking precision on the sphere by either changing its picking collider or by changing its bounding volume type. Full source code.
View Properties
As there are per object properties, picking in Away3D also involves global properties. Lets study these now.
Shader vs. Raycast Mouse Pickers
As mentioned before, Away3D offers a completely different approach for picking calculations. So far we have been dealing with the properties of individual objects, you can change the way picking works on a global scale too.
view.mousePicker = PickingType.SHADER;
You can choose from the following set of values:
-
PickingType.RAYCAST_FIRST_ENCOUNTERED ( default value )
Uses ray tracing as a picking method, stopping tests at the first successful renderable level collision. -
PickingType.RAYCAST_BEST_HIT
Uses ray tracing as a picking method, evaluating the best ( closest ) hit between all the colliding renderables. -
PickingType.SHADER
Uses a shader technique as a picking method, always evaluating the best hit.
The difference between first 2 options is quite subtle, lets first see the difference between the first 2 and the 3rd option, which represents a completely different picking technique from the others. As explained before, the first two are based on evaluating collisions between a ray and mathematical entities within the scene. The 3rd option ( SHADER ) does not evaluate ray-geometry collisions at all, but instead renders a portion of the scene around the mouse with specific colors into a temporary buffer, and then analyzes the color directly under the mouse to find which object is hit. This technique is harder to visualize, and is in fact what most high end 3D engines use, proving to be very efficient both in accuracy and performance. Unfortunately, this technique is not as performant in Flash’s Stage3D at this time.This is because it involves transferring images from the GPU to the CPU via Context3D’s drawToBitmapData() method, which is slow. You can read about this limitation in this article. The method introduces a severe bottleneck which is the sole reason why Away3D offers a raycast alternative and sets it as the default method. RAYCAST proves to be faster than the SHADER method in Flash. Keep in mind that you can only have one of the two methods per view, but not both, i.e. for the moment, you cannot have shader based picking on some objects and raycast based on other objects.
You may be asking yourself “why does Away3D still offer shader based picking if it is proved to be slower?”. Because it is still necessary in some situations. For example, when dealing with GPU animations and transformations, where geometry can be altered after the CPU stage, in the GPU, where the raycast approach could not possibly know where the vertices are, and will not be able to properly calculate ray-geometry collisions. Since the shader method is not ray-geometry collision based and deals with what is actually visible on screen, it is the method of choice when dealing with animated objects where high picking precision is desired. Listing 4 shows the effect of using ray versus shader based picking on an animated object. In this demo, we will also be using a sphere to trace where the mouse ray hits the mesh, as well as a line segment to trace the mesh’s normal at such point.

Listing 4. Picking on animated objects. A RAYCAST picker collides with the non-transformed geometry, whereas
the SHADER picker correctly collides with the visible geometry. Full source code.
Notice how the raycast method does not see the GPU level vertex transformations and instead hits the static “ghost” mesh. Such a problem does not exist for the shader method. Furthermore, the shader based method ignores the “.pickingCollider” property of objects since this property is only relevant for the raycast based method. The shader picker does however care about the object’s “.shaderPickingDetails” property
anObject.shaderPickingDetails = true;
This property simply asks the shader picker to evaluate not just whether the mouse events exist, but also the data involved in them such as position, normals, etc. The calculation of such information is not free as it is in the raycast approach, so it should only be requested when needed. If set to false, the mouse events will trigger, but some of the event properties will be null or invalid. The value is set to false by default, and in the case of listing 4, it needs to be enabled so that we can retrieve the location of the mouse event in the scene when using the shader picker.
Hopefully, Adobe will someday remove the drawToBitmapData() bottleneck and make all our lives easier!
The Raycast Mouse Pickers
On the previous section, we discussed the difference between the raycast pickers and the shader picker. Its time to talk about the difference between the two available raycast mouse pickers, (1) RAYCAST_FIRST_ENCOUNTERED and (2) RAYCAST_BEST_HIT. These are actually the same picker, but with slightly different settings. The differentiation exists for the same reason “best hit” and “first encountered” options exist in an object’s picking collider: for stopping the collision test as soon as it is needed in terms of precision. In this case, the test stops checking on the criteria of “renderables” instead of triangles.
-
PickingType.RAYCAST_FIRST_ENCOUNTERED ( default value )
Uses ray tracing as a picking method, stopping tests at the first successful renderable level collision. -
PickingType.RAYCAST_BEST_HIT
Uses ray tracing as a picking method, evaluating the best ( closest ) hit between all the colliding renderables.
But what is a “renderable”? The raycast picking system relies on an entity’s bounding volume, but an entity can contain multiple sub meshes. These sub meshes share a single bounding volume. A sub mesh is a renderable, and that is what a renderable is: something that can be drawn to screen. Sub meshes exist because Stage3D limits the amount of elements that can be put in a single buffer, so if the poly count increases beyond such limits in a mesh, a new set of buffers is created within a new sub mesh object. Such buffers represent vertices, normals, uvs, etc. With RAYCAST_FIRST_ENCOUNTERED, the picking system will not care about which colliding sub renderable is closest to the camera and stop collision checks as soon as a positive collision is found. RAYCAST_BEST_HIT, instead, will find all collisions amongst renderables and pick the one closest to the camera, and exist solely for this case where there are large meshes subdivided into multiple sub meshes.
This is in fact a very subtle difference, and to be honest, one not very easy to grasp, but it’s good to be aware of it. The use of RAYCAST_BEST_HIT should not be very common, but it is there in case its needed. For example, you will not have a problem if you align a set of cubes along the path of the mouse ray, RAYCAST_FIRST_ENCOUNTERED will do just fine with that, but if you import a mesh which contains a set of aligned cubes into the same geometry ( yeah, weird case ), you will need RAYCAST_BEST_HIT for proper picking. The following listing illustrates all of this. We added another cone tracer pointing towards the hit location just to help us know where it is.
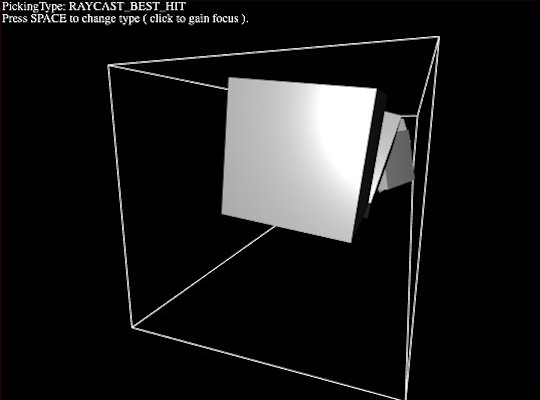
Listing 5. The two available raycast pickers on a mesh with multiple sub meshes. RAYCAST_BEST_HIT works, whereas RAYCAST_FIRST_ENCOUNTERED does not. Full source code.
As you can see, if the mouse ray hits more than 1 sub mesh with RAYCAST_FIRST_ENCOUNTERED, it will fail to identify the appropriate collision. RAYCAST_BEST_HIT however, always finds the right one. Notice how we used a AS3_FIRST_ENCOUNTERED collider on the mesh, otherwise we would be checking collisions with its bounding volume and not with the triangles of its sub meshes… even worse! Also, notice how we shuffled the z positions of the sub meshes. If we didn’t do this, the order of the sub meshes in the tree would coincide with the order in which they collide with the ray, hence achieving correct results by mere coincidence.
By now we have covered the 3 available mouse pickers, as well as the 7 available picking colliders for independent objects. Phewww, that’s quite a lot! But don’t worry, we have actually covered most of the topic of picking in the Away3D engine at this point. All this gives you a lot of flexibility when it comes to setting up mouse interactivity on your project as efficiently as possible. It can be confusing if you don’t understand what each feature does, but once you do, the decision becomes pretty obvious on each implementation.
UV Painting
There is one last bit of the picking system that is worth visiting. One that is simple, but yet important: the MouseEvent3D class. The scene position property of MouseEvent3D used in listings 4 and 5 allowed us to position a tracer mesh where the mouse ray collides with the object under it. MouseEvent3D also offers a series of other helpful properties:
-
scenePosition
The position of the event’s collision in scene space. -
localPosition
Same as (1) but in the hit object’s local space. -
sceneNormal
The object’s normal at the point of collision, in scene space. -
localNormal
The object’s normal at the point of collision, in object space. -
uv
The interpolated uv coordinates at the point of collision. Will not be available with raycast bounds collisions and shader collisions with details disabled. -
screenX and screenY
The position in screen space of the mouse event. -
material
The material of the colliding renderable. - etc…
The following listing uses the position property, as well as the normal and uv properties to draw a line segment representing the event’s normal and to paint on the object’s material.

Listing 6. Painting on an object. Full source code.
In this example, we’ve used PB_BEST_HIT as the mesh’s picking collider. This seemed appropriate given the considerable polycount of this mesh.
As you can see, MouseEvent3D provides useful information on the involved event, providing pretty much all the information needed for complex mouse interaction with the 3D scene. Fun!
Conclusion
As we have seen, 3D picking is not a trivial topic. It is something to understand and master properly for developing good quality 3D applications. Fortunately, Away3D offers a flexible feature set for such an important task.
We hope this tutorial has been helpful and that it has given you a good understanding of how picking works in Away3D.