This tutorial will show you how you can get animated models from 3DS Max into Away3D.
Contents:
Introduction
For the launch of Away3d 4.0 Gold, we have prepared a series of tutorials that show the workflow from various 3D applications to Away3D and the Flash Player. This tutorial shows how to take a biped-animated model from Autodesk 3ds Max and turn it into an interactive Flash file as in the example below.

Click in the SWF above to control the man using the arrow keys, the E-key, Shift and the Space bar. Click here to open a high resolution version of the file.
Make sure you have 3ds Max installed and working on your computer. Then download the latest official version of Away3D 4 from the Downloads section on Away3D.com or grab the most current version via GitHub (If you don't know what GitHub is, just use the Download section). You will also need a tool for creating your Flash file such as Adobe Flash Builder (download trial here).
Preparing the model in Max
The model and code for this tutorial was created by French designer Thillet Laurent. It started as a custom model that was rigged in Character Studio and animated with Biped. You can download the example files here. This ZIP archive contains the 3ds Max file, textures, Biped .bip files, a src folder containing the actionscript code as well as a file called ‘sequence.txt’ that we'll get back to later.
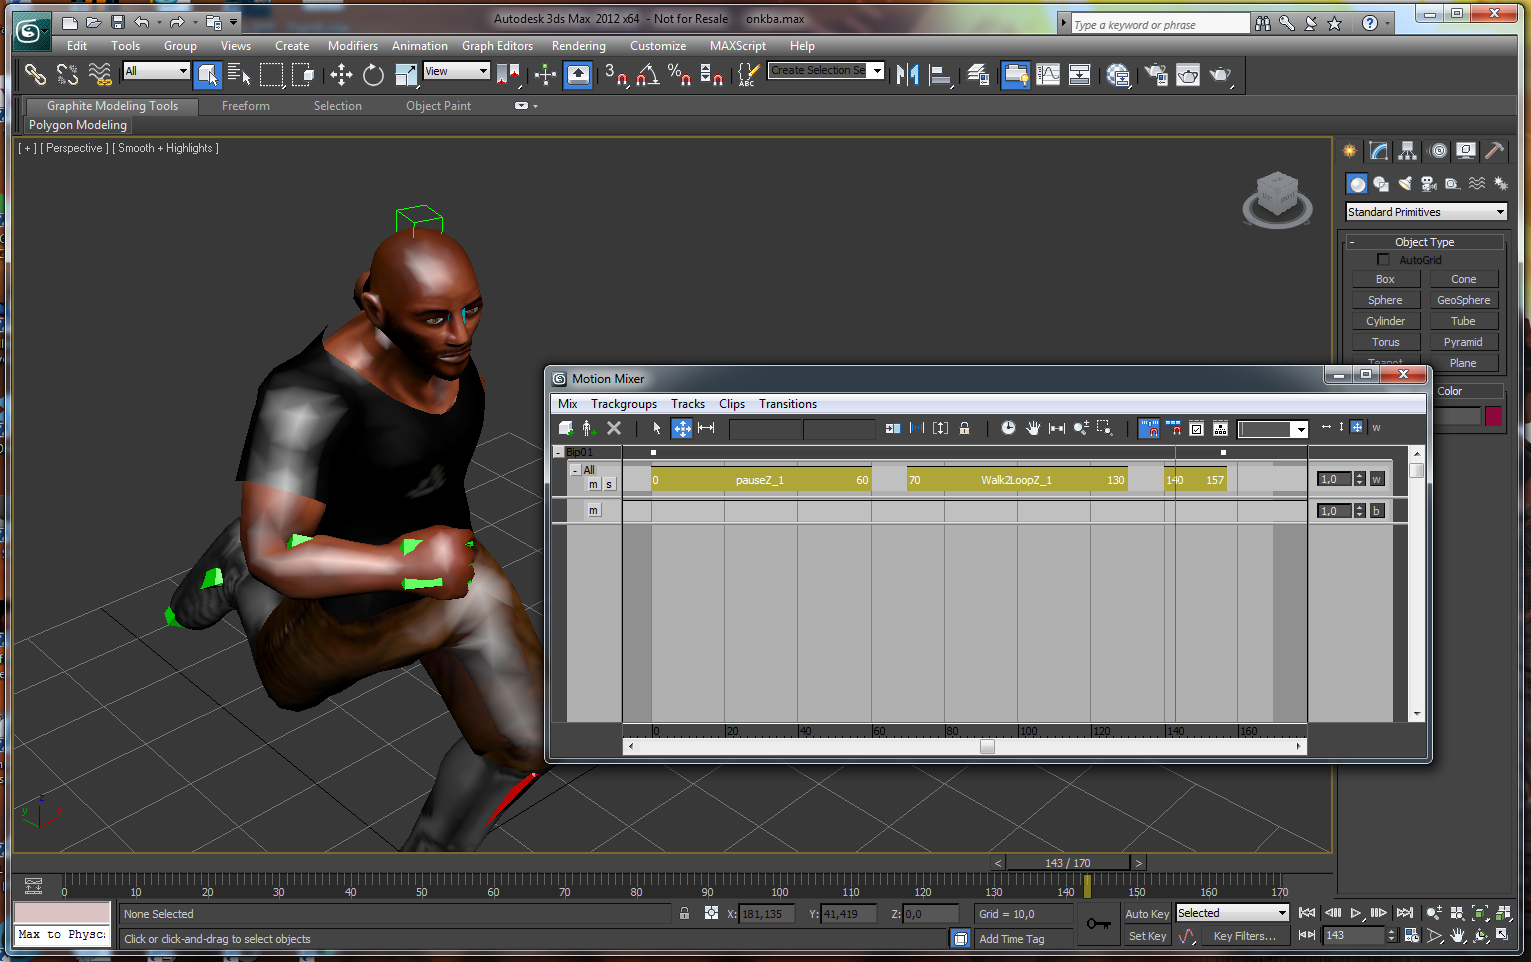
Opening the file ‘onkba.max’ in Max, you may get some dialogues as you open the file. Just click through these to open the file. Now you can use the scrub bar at the bottom of the screen to see the three animations showing the model in paused, walking and running states. If you open Graph Editors -> Motion Mixer, you can see the three Biped animations and how they are ordered. From this screen, you can speed up/slow down each animation by extending/compressing it and also change order and position on the timeline.
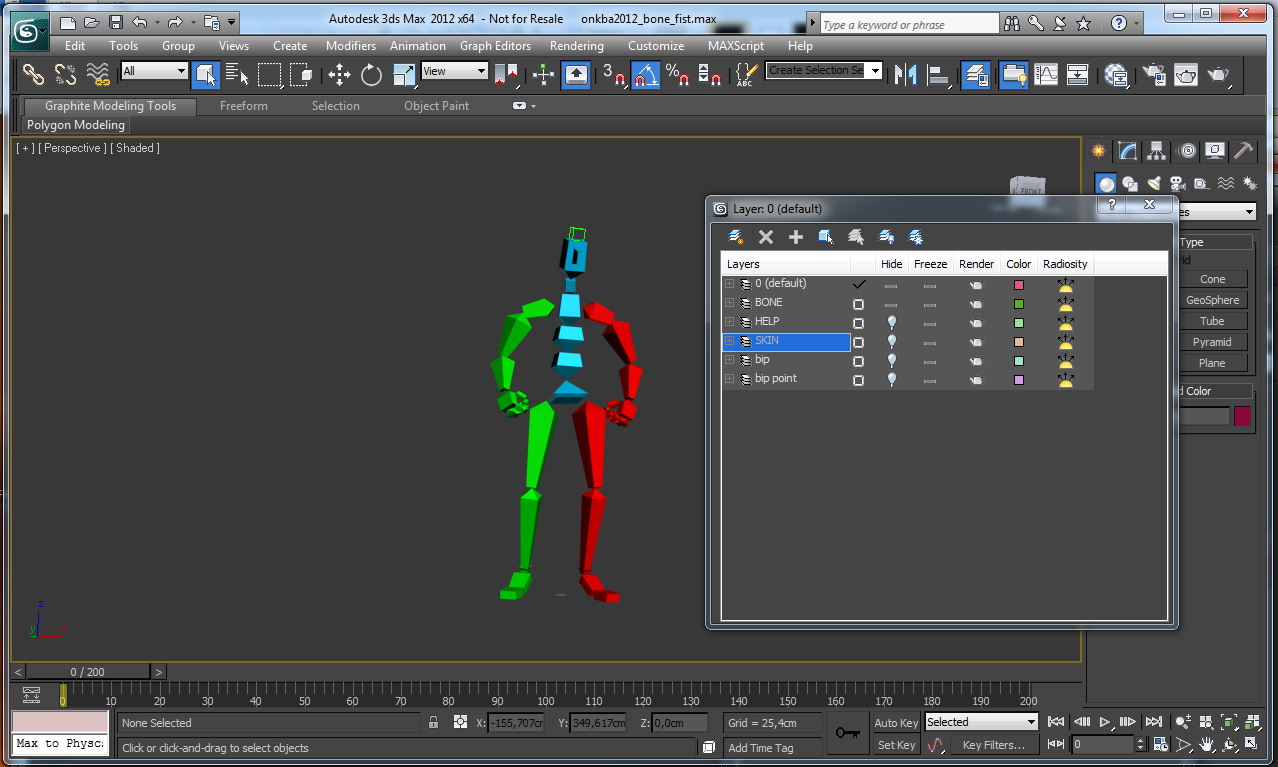
To view the Bones driving the animation, Open the Manage Layers panel. Turn off the bulb for the Hide-column on the BONE layer and turn it on for the SKIN layer. This skeleton will also be exported in the AWD file, but you can turn it off using Actionscript when playing it back. An option to only include layers set as ‘renderable’ is on the current wish-list that will solve this in the future.
While you are working with your own files for AWD export, keep in mind that AWD currently supports geometry and meshes (including instancing), scene graph with containers and parenting, basic color and texture materials, skeletons and skeletal animation. Anything other than this such as procedural textures and other Max specific features will be ignored.
Exporting from Max
Once you have finished your model, we need to set up what parts of the animation we want to export. Start by creating a new folder that we can place our files in. Open a new Notepad-file and save it as ‘sequences.txt’ in the newly created folder. This file couples the animated frames with names that we can later reference in our code. You can find full instructions on this Wiki page.
For our example file, we'll use the following content:
Breathe 0 60
Walk 70 130
Run 140 157
This file is only used when exporting from Max, as the exporter embeds this data into the AWD file. You can change the sequence around and the first one mentioned will be played back by the AWD preview application that is included with the exporter plug-in. Now we are ready to export. Select Export from the main menu and browse to the correct folder. Choose AWD in the dropdown and input a file name. Once you click through, you'll get to the AWD export settings dialogue. click through the various headings to inspect the options available. For most purposes, the defaults are fine. Make sure that the name of the text file you just created is correct and click on the ‘Flash Viewer’ heading.
After exporting the file, the exporter will by default create and open a Flash preview file. If you just want to view the file on your computer make sure ‘Export for local preview’ is checked. If you want to export the file for others to view online, check the ‘Export for deployment’ option. If you choose the latter, you will not see anything when opening the exported file locally. This is expected behavior and part of the Flash Player security sandbox model.
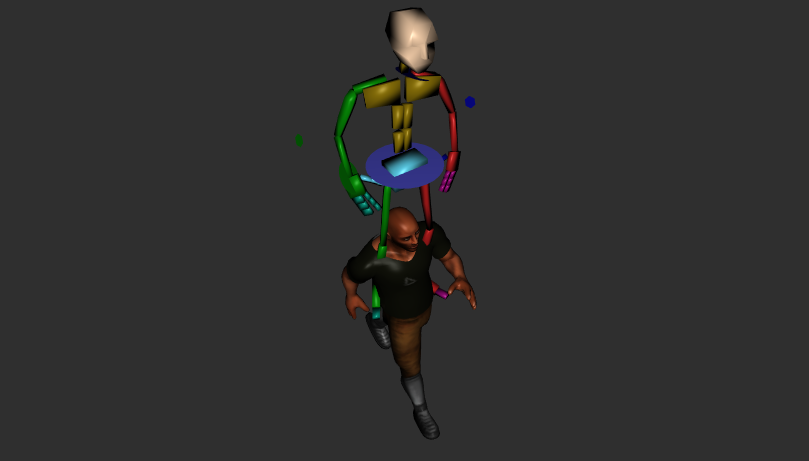
Note that the plugin will export the whole scene. Exporting only selections is currently not supported. In our case, we'll want to view the exported file so check the ‘Export for local preview’-option. The resulting file will look like this:
Don't worry if the Skeleton shows in the exported file. When you use it in Flash, it's up to you to make it visible. In other words - just ignore it and it won't be shown.
Using the model in Flash
This tutorial will not focus on the basic setup of an Away3D 4 scene, but check out the Tutorials section for tutorials teaching the basics of cameras, lights, materials and adding objects to your scene. In this tutorial, we'll be concentrating on the steps that make it possible to load the exported AWD file and then how to access and control the animations within.
For the Flash part of this tutorial, we'll use the Adobe product Flash Builder (download 30-day trial version here), but you can of course use any other IDEs as well. You can find a detailed description on how use Away3D with Adobe Flash, Flash Builder and the free Open Source tool FlashDevelop here. You may also be interested in this tutorial that explains how to use Actionscript projects in these same tools.
Start by creating a New -> Actionscript Project. Name the project ‘MaxAWDWorkflow’ and press ok.
Copy all the example files for this tutorial (link) into the newly created project folder. This will replace the empty actionscript file named ‘MaxAWDWorkflow.as’ that your IDE created for you. We'll use this very soon, but first we need to tell Flash Builder where to find the Away3D source files.
You can download the source files either as a ZIP archive (link) from Github as mentioned above. Once you have copied these files to a suitable folder on your computer, you right click your project root and click ‘Properties’ in the popup menu. Click the ‘Actionscript Build Path’ in the dialogue that opens, then on the ‘Source Path’ button and click the ‘Add Folder’ button. Select the folder containing the Away3D source files and close the dialogues.
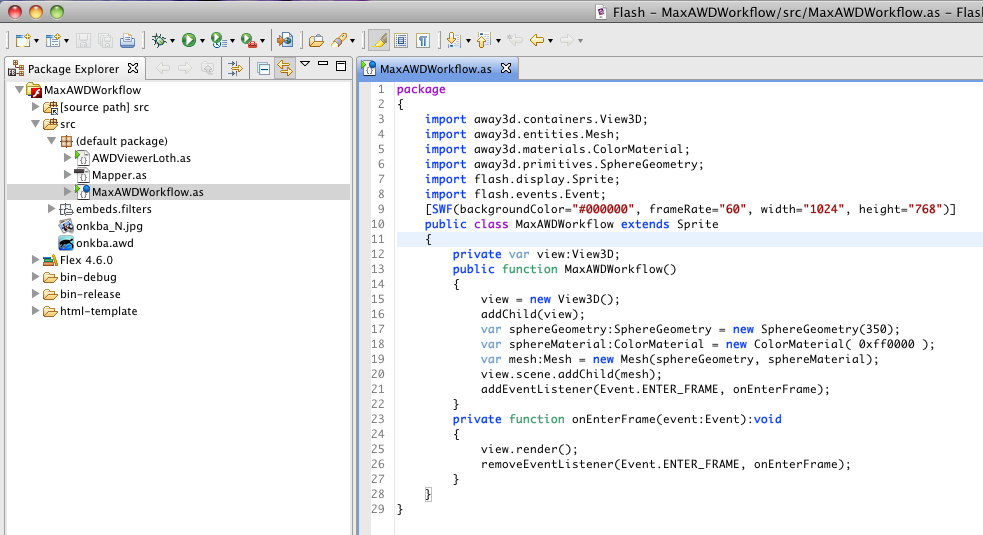
Your Project Explorer should now have the following files and folders and the MaxAWDWorkflow.as file should now contain the following:
Click the green ‘Run’ button at the top and verify that you can see a round, red sphere. If you can't see anything in the exported file or you get a ‘Error #2044’ message, you may need to add a little extra code to your HTML template. This is explained in the section below. If you see the red sphere, skip ahead to the next heading.
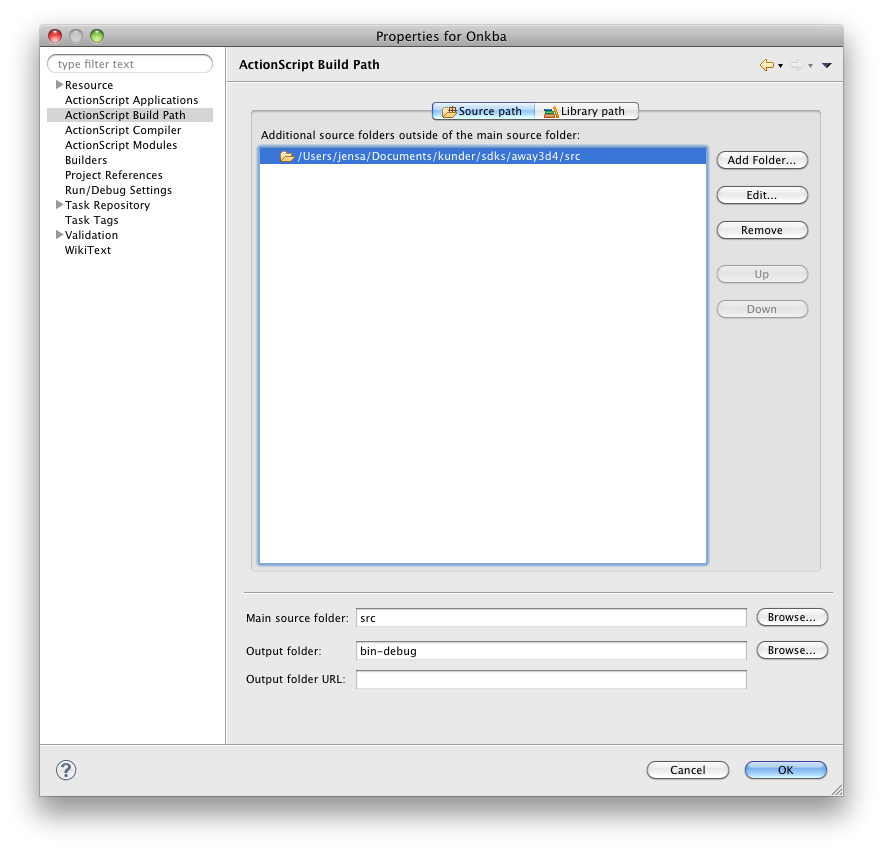
Stage3D embedding
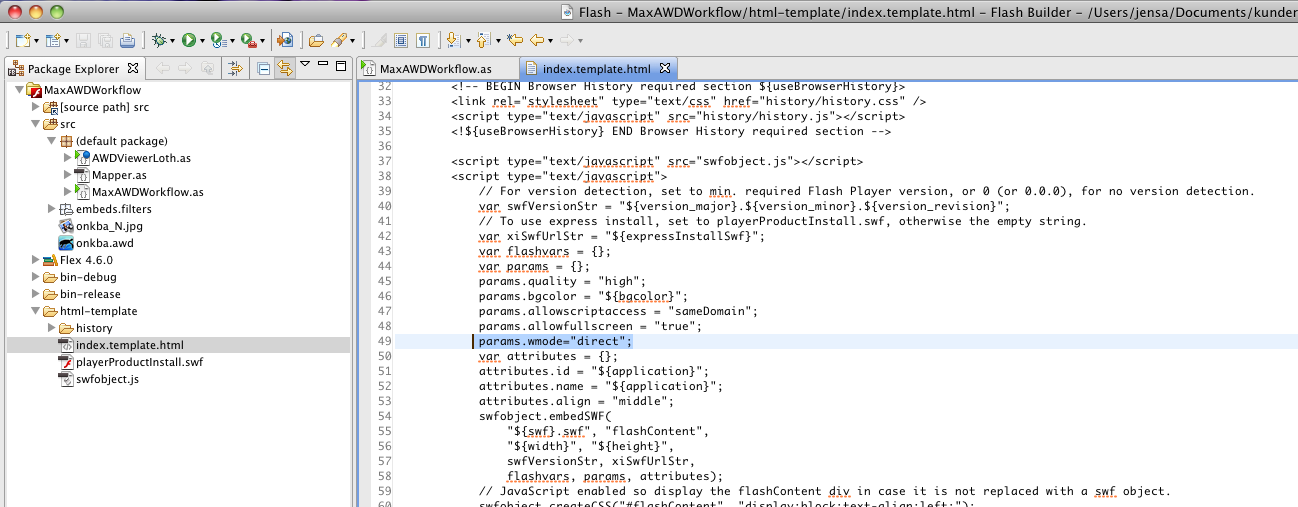
Unfortunately, you can't just export your file when working with Stage3D. The most common problem is that you get a dialogue that says ‘Error #2044: Unhandled ErrorEvent:. text=Error #3702: Context3D not available.’ Context3D is one of the core classes for Stage3D in the Flash Player. Using Stage3D requires that you set the following parameter in your HTML embed code:
params.wmode='direct';
Click to expand the image below and you can see the required addition in context.
If you are using Adobe AIR, you may need to add:
<renderMode>direct</renderMode>
into your application.xml. If you still have problems, note that if you are using Flash Builder, IntelliJ or FlashDevelop or any IDE based on an older version of the Flex SDK, you will need to add the following compiler argument:
-swf-versi>
 This will force compilation for Flash Player 11.x.
Running the example file
Once you know this works as intended, it is time to test the exported .awd file. To do this, set the 'AWDViewerLoth.as' file to be the file to run.
How to do this varies by IDE, but in Adobe Flash Builder, you just right click the 'AWDViewerLoth.as'-file and select 'Set as Default application'. Just keep the 'AWDViewerLoth.as' open for the rest of this tutorial as we'll be referencing bits of it later on. Press the green Run button again and if all goes as intended, you'll soon see our animated friend. You can use the WASD keys to rotate and walk around. Hold down the Shift key to run.
So what makes this model work? I'll walk you through the code next. The constructor-method contains calls to the methods initEngine, initText and initLights. These set up the scene, view and camera, all the basics that we need to view our 3D content. The last method called in the constructor is called initLoading and this is where we load our assets using the AssetLibrary class.
The AssetLibrary
This is a new class in Away3D 4 and it really simplifies working with loaded assets. Assets are any item that can be used in the engine: a Mesh, a Geometry, a BitmapTexture etc. You basically just tell the AssetLibrary to load what you need (models, textures, animations) and then request the results when loaded.
The first thing you must do is to enable the file format parsers that you want to use in your project. Away3D4 can import files in the formats OBJ, AC3D, DAE, 3DS, MD2, MD5 as well as the native AWD1 and 2 formats. If you are lazy, you can add all these parsers in one go:
Parsers.enableAllBundled();
However, the more parsers you enable, the larger your swf-file. In our project, we're saving 82Kb by enabling the AWD2 parser only:
AssetLibrary.enableParser( AWD2Parser );
The AssetLibrary will keep you updated on the loading progress. This is done using the Event-listener system built into Flash:
AssetLibrary.addEventListener( AssetEvent.ASSET_COMPLETE, onAssetComplete );
AssetLibrary.addEventListener( LoaderEvent.RESOURCE_COMPLETE, onResourceComplete );
AssetLibrary.addEventListener( LoaderEvent.LOAD_ERROR, onLoadError );
The code above lets us listen for three important things:
AssetEvent.ASSET_COMPLETE
A 3D model may require more than just the mesh. In our case, the model contains animations that are controlled by a skeleton. The skeleton has different poses and it may also embed materials (basic color-materials and textures are supported). The model itself is built from many different sub-meshes and these contain geometry. Using the onAssetComplete-method you can inspect at all of these as they load in and apply actions to them.
In this tutorial, we only use this event for debugging as the loading itself is handled by the AssetLibrary. By using a trace-command, we can see the name and type of each asset as it is loaded in. As you can see, the loaded assets all have the same names we used when authoring in 3ds Max and the animations map to the names we added to the ‘sequencences.txt’ file. If there is a naming conflict, the AssetLibrary has ways of handling this too. Taking care when naming your models, will save you any problems with this.
You can also listen for even more granulated events that tell when each of these assets has been loaded. You can look up these events by looking at the top of the AssetLibraryBundle-class included in the Away3D source.
LoaderEvent.LOAD_ERROR
In the event of something not loading as it should, we have to handle this in some way. In this tutorial, we are just tracing the error out to the console, but for a larger project it will be helpful to show the user an error message.
If you do not add a handler for this event, your project will simply not display anything. No error will be displayed to the user unless they have the special Debug version of the Flash Player installed. This is only common among Flash developers, so you should be able to see ‘Error #2032: Stream Error’ in your IDE if this happens. Normal users will just see a blank screen, so make sure you handle this event by adding this EventListener to your loader.
LoaderEvent.RESOURCE_COMPLETE
For every element you request that the AssetLibrary should load, this event will fire. In our case, the texture is separate from the AWD model so we have two load calls:
AssetLibrary.load( new URLRequest( TEXTURE_URL ) );
AssetLibrary.load( new URLRequest( MESH_URL ) );
Note that AWD2 may also embed the textures into the model. This simplifies asset management at the price of larger files.
On the web, there is no guarantee that assets will complete loading in the same order as we request them. To manage this, the onResourceComplete-method maintains a counter to check that we have loaded all the resources we need before moving on. Once both the model and the texture has loaded, it is safe to display our 3D model. This is done in the setupScene-method.
Rendering the output
Anything that is to be rendered in Away3D must be added to ‘the scene’. Some parts such as the ‘ground’ was added in the initEngine-method. In the setupScene-method we prepare the material for our ‘hero’ and then apply it to the model. The model is also scaled. Since most 3D programs work in arbitrary ‘units’, scaling your model will often be required.
hero.scale( 8 );
This is easy to avoid if you just know how the camera-setup will work. You can of course also tweak the camera setup to compensate for model size. It's all relative, so you decide. For larger 3D projects it is important to avoid any such issues by agreeing on a ‘world scale’ and then making sure all models follow that.
When the model is set up as we want it, we add it to our scene:
scene.addChild( hero );
This makes the model renderable and thus visible. It'll be standing in the default pose so, next up we set up the animation set. This acts a container for animation data and use the values we captured in the ASSET_COMPLETE handler earlier:
animati SkeletonAnimationSet(3);
animationSet.addState(breatheState.name, breatheState);
animationSet.addState(walkState.name, walkState);
animationSet.addState(runState.name, runState);
Now that we have our animation set, we set up our animator that will connect the animation data to the model, and provide a control mechanism. We do this with an animator object that ties together the skeleton we retrieved from ASSET_COMPLETE along with the newly created animation set, and applies it to our hero model. In order to stop the character from walking away from the camera, we disable the position update that usually applies to bones animation when any motion is expected
animator = new SkeletonAnimatior(animationSet, skeleton);
animator.updateRootPositi = animator;
Finally, we define a state transition for our animation states. This is used when transitioning active states in the animator, and can be custom created for whatever behavior is required. For now, we will use the default crossfade transition object:
crossfadeTransiti CrossfadeStateTransition(XFade_TIME);
XFADE_TIME is a constant (defined at the top of the Actionscript file) that tells how many seconds Away3D should blend between the current and the new animation state. Setting this to zero would cause the change to happen instantly. This looks bad, so you usually want to blend the vertex positions as we do here.
To be sure that all the animations were successfully loaded and created, we test that animationSet.hasState for each animation exists. This isn't required, but it's a good idea to do this to avoid strange errors. If all is good, we point the camera at our hero and start rendering and listening for user input.
Depending on what key the user presses, the movement of the character is done in the updateMovement-method. If the user is not pressing any key, the goToPauseState method is executed. In both of these, we set the name of the animation state and then activate it using:
animator.play(currentAnim, crossfadeTransition);
Summing up
Thanks to the AWD format and the AWD plugins, it is easy to import animated and textured models straight from Autodesk 3ds Max into Away3D. The new AssetLibrary in Away3D 4 simplifies the loading procedure for anything ranging from basic scenes like this, to large and complex games. The Actionscript language makes it easy to build large scale interactive applications for the web and mobile and the compact AWD files improve the end user experience by ensuring less loading time.
